How to use a ring sizing kit correctly
Use gauge rings or a reusable sizing belt on the exact finger you plan to wear the ring on. The sample should pass the knuckle with gentle resistance, sit comfortably at the base, and come off with a controlled twist. Repeat the test on another ordinary day and match the gauge width and size system to the ring you intend to buy.
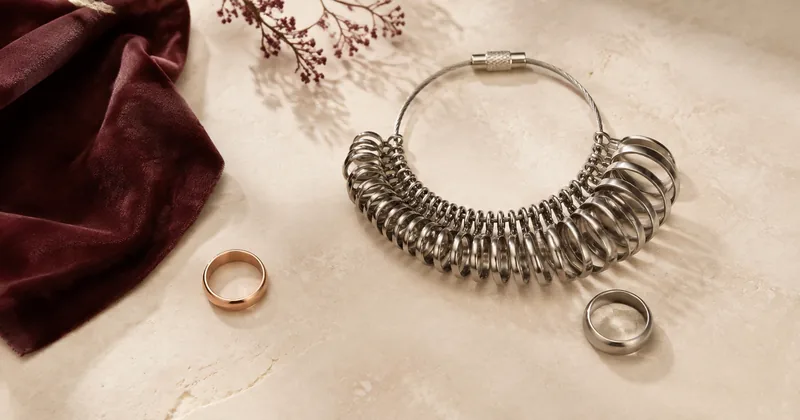
A ring sizing kit is most useful when you treat it as a fit test, not as a box that produces an infallible number. Use the finger gauges for a finger, a mandrel for a ring that already fits, and calipers only for a round ring whose inside edge you can identify clearly. Test the intended hand and finger under normal conditions, record the unconverted result, and confirm that the seller uses the same sizing system.
The principle is simple, but the details matter. A narrow sample can feel comfortable while the wide finished band feels tight. A gauge can fit the finger base yet fail at the knuckle. A US 7 is also not the same label as a UK N or an ISO-style circumference. The method below turns the kit into evidence you can show a jeweller rather than a number you have to defend from memory.
Use this six-step quick start:
- Identify the tool and the sizing system printed on it.
- Test the exact hand and finger where the ring will be worn.
- Compare the apparent best size with the adjacent gauge on each side.
- Require gentle knuckle resistance without pain, numbness, or force.
- Match the sample width and inside profile to the planned ring.
- Repeat on another ordinary day and record the unconverted result.
What is included in a ring sizing kit?
A home kit may contain one or more of three tools. A set of loose gauge rings lets you try several fixed openings on a finger. A reusable plastic belt, sometimes called a multisizer, forms an adjustable loop and points to a size on its scale. A tapered ring stick or mandrel measures the inside of an existing ring. Some kits also include a printed chart or digital calipers, but those accessories do different jobs and should not be treated as interchangeable.
Inspect the scale before using anything. Identify whether it shows US numbers, UK letters, millimetres, or another system. Check whether the gauges progress in whole, half, or quarter steps, and make sure no rings are missing. A kit that says only “size 7” without naming the system is not enough for an international order. The ISO 8653:2016 summary describes ring-size measurement and designation, and notes that consumer finger gauge sets use a ring for each size. That supports the central idea: a physical sample is meant to reproduce an opening, not merely display a label.
Which tool should measure a finger and which should measure a ring?
Use fixed gauge rings or the adjustable belt to measure a finger. Use a ring mandrel to measure an existing ring. Do not push a bare finger down a rigid tapered mandrel, and do not expect an adjustable belt to reveal the manufactured size of a ring. The two tasks answer different questions: one asks which opening fits a changing human finger, while the other describes the opening of a finished object.
For an existing round ring, slide it gently onto the mandrel without pressure and read the point specified by the tool’s instructions. Tapered, very wide, contoured, stone-set, or visibly oval rings can require professional interpretation. GIA’s quality-assurance benchmark for finger and ring sizing shows that the reading point changes with ring geometry and that protruding stones may require a grooved mandrel. If you only have a ring and a screen, the existing-ring measurement guide explains safer diameter and on-screen comparison methods.
How should you prepare before testing the gauges?
Choose the exact hand and finger where the new ring will be worn. Remove other jewellery and wait until the hand feels normally warm and dry. Do not measure immediately after coming in from severe cold, taking a hot shower, completing hard exercise, or doing anything that makes your hands feel unusually swollen.
Stop the sizing session immediately if pain or swelling begins. Remove the gauge or jewellery only if it comes off easily; if it does not, seek prompt professional help. NHS finger-pain guidance advises removing jewellery from a painful finger and seeking urgent help for severe pain, a finger that changes colour, or loss of feeling after an injury; it also advises a GP assessment for tingling or developing numbness. NHS hand-swelling guidance says severe, painful, sudden, unexplained, red, or hot swelling warrants urgent help. In the UK, follow its 111 or emergency instructions; elsewhere use the equivalent local service.
Write down the intended band width and inside profile before you start. Lay the gauges in order on a clean surface, check for sharp moulding seams, and wash reusable items according to the supplier’s instructions if other people have handled them. Test at a calm pace. Repeatedly forcing a tight gauge over the joint can irritate the finger and make the next reading less representative.
Time is part of the record, not a correction formula. The best time to measure ring size guide explains how to compare readings across ordinary days. The aim is to observe your normal fit range rather than chase the smallest result you can obtain.
How do you test a fixed ring gauge correctly?
Begin near your expected size and move one step at a time. Slide the gauge over the fingertip and knuckle without forcing it. Once it reaches the wearing position, relax the hand, make a gentle fist, and straighten the fingers. The gauge should not pinch at the base or threaten to slip off when the hand points downward. To remove it, use a small controlled twist. Gentle resistance at the knuckle is useful; pain or a prolonged struggle is not.
Compare the adjacent size on each side even if the first gauge seems acceptable. A good comparison is more informative than a single pass. Keep each candidate on only long enough to assess ordinary comfort, and follow the kit maker’s safety instructions. Do not sleep, exercise, drive, or operate equipment while wearing loose kit parts.
Fixed gauge rings let you compare adjacent manufactured openings on the actual finger and include the joint in the test. Use the proper-fit checklist to interpret light contact, difficult removal, spinning, and warning signs consistently.
How do you use an adjustable belt-style sizer?
Thread the belt exactly as its instructions show so the numbered scale remains visible. Form a round loop rather than flattening it into an oval, place it on the intended finger, and pull only until it rests like a ring. The loop should move over the knuckle with controlled resistance in both directions. If you tighten it only at the finger base, you may create an opening that cannot clear the joint.
Read the scale at the indicator specified by that product. Do not assume the edge, arrow, or slot has the same meaning on every design. Repeat the reading after fully loosening and re-forming the loop. Plastic can bend, a belt can be pulled tighter than a solid ring, and the tail can alter how the loop feels. Those are reasons to use the result as a shortlist for fixed samples, especially for an expensive order.
Record both the displayed size and any millimetre value the tool supplies. If the scale is unclear, contact the kit seller instead of inferring a system from familiar-looking numbers. The measurement-method comparison shows where adjustable tools, fixed gauges, printed sizers, and professional fitting each add confidence.
How should you handle a large knuckle or tapered finger?
Measure the route the ring must travel as well as the place it will rest. If the knuckle is wider than the base, the smallest comfortable base measurement may be impossible to put on or remove. Try the gauge over the joint, then observe how much it rotates at the base. Do not force the lower size simply because it stops movement. Conversely, do not accept a gauge that slips over the knuckle with almost no resistance merely because it feels comfortable while the hand is still.
Record two observations for the jeweller: the smallest gauge that crosses the joint safely and the way that gauge behaves at the base. This is more useful than trying to average a knuckle reading and a base reading into one invented size. A professional may recommend a design or fitted feature that addresses the difference.
The large-knuckle sizing guide covers sizing beads, hinged solutions, and fit trade-offs. A tapered finger can present the reverse security problem because there is less of a ledge below the ring. In both cases, the final ring’s weight and shape matter as much as the kit number.
Why must the gauge width match the finished ring?
A broad band contacts more of the finger than a slim one and can feel snugger at the same labelled opening. Several stacked bands create a similar combined-width effect. An adjustable belt or a thin set of gauges can therefore identify a useful starting size without reproducing the fit of a wide wedding band. This is a geometry problem, not proof that either tool is defective.
Ask whether the kit contains wide-band gauges or whether the retailer can send samples in the finished width and inside profile. Test a bridal set together if the rings will normally be worn together. GIA’s professional benchmark separates narrow, wide, tapered, convex-interior, and bridal set cases because the correct measuring procedure is not identical for all of them.
Avoid adding a universal amount such as “always go up half a size.” The necessary decision depends on total width, the inside curve, the knuckle, and the maker’s construction. Use the wide-band sizing guide for a width-matched test and the comfort-fit comparison when the product description mentions a rounded or convex interior.
How should you record and convert the result?
Write a complete record: date, time, hand, finger, tool, gauge width, displayed system, best-fitting size, adjacent sizes tested, and how each passed the knuckle. Photograph the labelled gauge beside the hand if privacy and the kit rules allow. Preserve any millimetre measurement without rounding. That record makes a later disagreement traceable and prevents a UK letter from being mistaken for a US number.
Convert only after identifying the source system. International charts are equivalence aids, and the available steps may not line up perfectly. Use the ring-size converter to compare labels, then send the retailer both the original result and the converted request. Ask which chart they use and whether their listed size refers to inner circumference, diameter, or a regional code.
If the kit came from the same retailer as the ring, follow its documented scale and fitting instructions first. If it came from elsewhere, use it to narrow the options and request a retailer-specific sample where the return or remake consequences are high. A measurement becomes safer when the person making the ring can see how it was obtained.
What ring sizing kit mistakes should you avoid?
The most common mistake is treating a single comfortable moment as the final answer. Others include testing the wrong hand, pulling an adjustable loop too tight, reading the wrong side of an indicator, measuring only below the knuckle, and using a narrow gauge for a wide finished band. Damaged, incomplete, or unlabelled kits add uncertainty that repetition cannot remove.
Do not average incompatible measurements. A US label, UK letter, inside diameter, and inside circumference must first be identified and converted on a known basis. Do not round before the seller sees the original value. Do not assume a ring mandrel can size an oval ring accurately, or that an existing ring belongs to the finger for which you are shopping.
Finally, do not override a failed safety check because the number matches an online chart. If a gauge causes pain, colour change, tingling, or cannot be removed with a gentle technique, stop. The ring-sizing mistakes guide provides a reusable audit for tool, unit, timing, and recording errors.
When should a jeweller confirm your kit result?
Get an in-person confirmation when the ring is expensive, custom, engraved before delivery, hard to resize, unusually wide, stone-set around most of the band, or made from a material the seller does not resize. Professional help is also valuable when the knuckle and finger base require opposing choices, when two careful kit sessions disagree, or when an existing ring is not round.
Bring the kit record and product specification. Ask the jeweller to test a sample with comparable width and inside profile, name the sizing system on the order, and write down the selected size. Also check the exchange, remake, and resizing terms before approving irreversible work. The between-sizes guide can help frame that final decision, but it cannot replace a sample of the actual construction.
A kit is successful when it narrows uncertainty honestly. Use the correct tool, reproduce the wearing conditions, test the knuckle and base, and preserve the measurement context. That process is more dependable than collecting several disconnected numbers and choosing the one that looks most familiar.